

安装步骤图
部署架构图

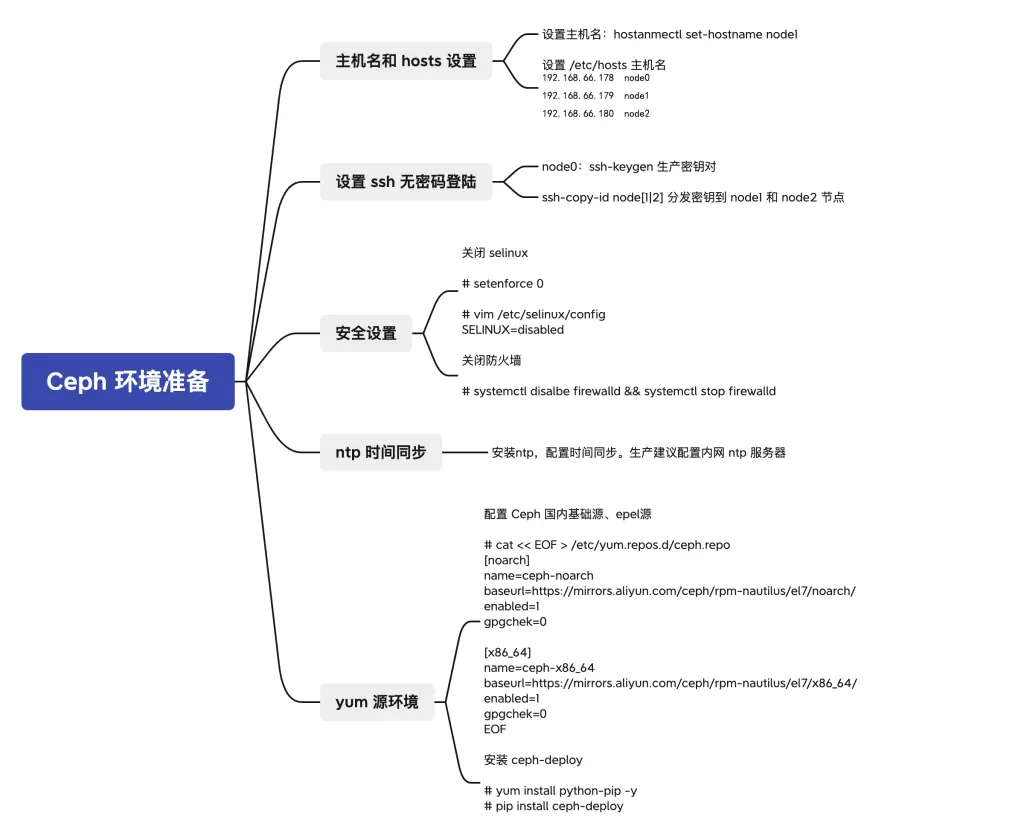
基础环境准备
(除了配置ssh免密码登录,其他步骤不可少)
主机名和host设置
hostnamectl set-hostname node0
hostnamectl set-hostname node1
hostnamectl set-hostname node2
host设置
192.168.66.178 node0
192.168.66.179 node1
192.168.66.180 node2

免密登录
安全设置(关闭防火墙 SELinux)
#关闭SElinux
setenforce 0
sed -i 's/^SELINUX=.*/SELINUX=disabled/' /etc/selinux/config
ntp时间同步
#安装ntp软件
yum -y install ntp ntpdate ntp-doc

#设置时间同步
yum -y install ntp ntpdate ntp-doc
node0 节点
# 直接启动服务(生产环境建议配置为公司内网 ntp 服务器地址)
$ systemctl enable ntpd --now
$ systemctl status ntpd

# 查看时间同步情况
$ ntpq -pn
     remote           refid      st t when poll reach   delay   offset  jitter
==============================================================================
*144.76.76.107   192.53.103.103   2 u   13   64    1  260.282   16.002   4.469
 139.199.215.251 100.122.36.196   2 u   12   64    1   35.861    1.548   0.880
 5.79.108.34     130.133.1.10     2 u   11   64    1  276.901  -22.095   0.573
 116.203.151.74  .INIT.          16 u    -   64    0    0.000    0.000   0.000
node1 节点
# 修改时间同步源地址为 node0 IP 地址
$ vim /etc/ntp.conf

......
# Use public servers from the pool.ntp.org project.
# Please consider joining the pool (http://www.pool.ntp.org/join.html).
#server 0.centos.pool.ntp.org iburst
#server 1.centos.pool.ntp.org iburst
#server 2.centos.pool.ntp.org iburst
#server 3.centos.pool.ntp.org iburst
server 192.168.66.178 iburst

......

# 启动服务
$ systemctl enable ntpd --now
$ systemctl restart ntpd
$ systemctl status ntpd

# 查看时间同步情况
# ntpq -pn
     remote           refid      st t when poll reach   delay   offset  jitter
==============================================================================
*192.168.66.178  139.199.215.251  3 u    6   64    1    0.558   -3.779   0.173
node2 节点
# 修改时间同步源地址为 node0 IP 地址
$ vim /etc/ntp.conf

......
# Use public servers from the pool.ntp.org project.
# Please consider joining the pool (http://www.pool.ntp.org/join.html).
#server 0.centos.pool.ntp.org iburst
#server 1.centos.pool.ntp.org iburst
#server 2.centos.pool.ntp.org iburst
#server 3.centos.pool.ntp.org iburst
server 192.168.66.178 iburst

......

# 启动服务
$ systemctl enable ntpd --now
$ systemctl restart ntpd
$ systemctl status ntpd

# 查看时间同步情况
# ntpq -pn
     remote           refid      st t when poll reach   delay   offset  jitter
==============================================================================
 192.168.66.178  139.199.215.251  3 u    1   64    1    0.584    5.516   0.161
yum 源环境设置
阿里云yum源(推荐)
cat << EOF > /etc/yum.repos.d/ceph.repo
[ceph]
name=Ceph packages for $basearch
baseurl=http://mirrors.aliyun.com/ceph/rpm-nautilus/el7/x86_64
enabled=1
gpgcheck=0
[ceph-noarch]
name=Ceph noarch packages
baseurl=http://mirrors.aliyun.com/ceph/rpm-nautilus/el7/noarch
enabled=1
gpgcheck=0
[ceph-source]
name=Ceph source packages
baseurl=http://mirrors.aliyun.com/ceph/rpm-nautilus/el7/SRPMS
enabled=1
gpgcheck=0
EOF
Centos源
cat << EOF > /etc/yum.repos.d/ceph.repo
[centos-ceph-nautilus]
name=CentOS-$releasever - Ceph Nautilus
mirrorlist=http://mirrorlist.centos.org/?release=$releasever&arch=$basearch&repo=storage-ceph-nautilus
#baseurl=http://mirror.centos.org/$contentdir/$releasever/storage/$basearch/ceph-nautilus/
gpgcheck=1
enabled=1
gpgkey=file:///etc/pki/rpm-gpg/RPM-GPG-KEY-CentOS-SIG-Storage

[centos-ceph-nautilus-test]
name=CentOS-$releasever - Ceph Nautilus Testing
baseurl=https://buildlogs.centos.org/centos/$releasever/storage/$basearch/ceph-nautilus/
gpgcheck=0
enabled=0
gpgkey=file:///etc/pki/rpm-gpg/RPM-GPG-KEY-CentOS-SIG-Storage

[centos-ceph-nautilus-source]
name=CentOS-$releasever - Ceph Nautilus Source
baseurl=http://vault.centos.org/$contentdir/$releasever/storage/Source/ceph-nautilus/
gpgcheck=1
enabled=0
gpgkey=file:///etc/pki/rpm-gpg/RPM-GPG-KEY-CentOS-SIG-Storage
EOF
Ceph 安装
以下步骤如无特殊说明,只需要在 node0 节点执行即可
安装 ceph-deploy 软件
# 安装 ceph-deploy
#说明:ceph-deploy 是 ceph 软件定义存储系统的一部分,用来方便地配置和管理 Ceph 存储集群

$ yum install python-pip -y
$ pip install ceph-deploy

# 查看 ceph-deploy 版本
$ ceph-deploy --version
2.0.1
安装 ceph 集群组件软件
此步骤需要在3个节点上运行
$ yum install ceph ceph-mds ceph-mgr ceph-mon ceph-radosgw -y
$ yum install -y --nogpgcheck librbd1
$ yum install -y --nogpgcheck libcephfs2
$ yum install -y --nogpgcheck ceph-mon
$ yum install -y --nogpgcheck ceph-mds
$ yum install -y --nogpgcheck ceph-mgr
$ yum install -y --nogpgcheck ceph-radosgw
$ yum install -y --nogpgcheck ceph
Ceph 集群初始化
创建目录,保存初始化集群信息
$ mkdir /etc/ceph-deploy -pv && cd /etc/ceph-deploy
$ cd /etc/ceph/

$ ceph-deploy new -h
$ ceph-deploy new --cluster-network 192.168.66.0/24 --public-network 192.168.66.0/24 node0
$ ls
ceph-deploy-ceph.log  ceph.conf  ceph.mon.keyring

$ ceph-deploy mon create-initial
$ ls -l
total 108
-rw-------. 1 root root   113 Oct 13 14:03 ceph.bootstrap-mds.keyring
-rw-------. 1 root root   113 Oct 13 14:03 ceph.bootstrap-mgr.keyring
-rw-------. 1 root root   113 Oct 13 14:03 ceph.bootstrap-osd.keyring
-rw-------. 1 root root   113 Oct 13 14:03 ceph.bootstrap-rgw.keyring
-rw-------. 1 root root   151 Oct 13 14:03 ceph.client.admin.keyring
-rw-r--r--. 1 root root   267 Oct 13 13:45 ceph.conf
-rw-r--r--. 1 root root 78676 Oct 13 18:02 ceph-deploy-ceph.log
-rw-------. 1 root root    73 Oct 13 13:45 ceph.mon.keyring

$ ceph -s
[errno 2] error connecting to the cluster
设置 admin 认证 , ceph -s 正常显示
# 节点分发管理员配置文件到所有节点
将 keyring 同步到各节点,以便其它节点可以执行 ceph 集群管理命令(在 ceph01 上执行)
# ceph-deploy --overwrite-conf admin node0 node1 node2
#
$ ceph -s
  cluster:
    id:     623d5c57-c330-487b-9ed3-d550f8306eaf
    health: HEALTH_WARN
            mon is allowing insecure global_id reclaim

  services:
    mon: 1 daemons, quorum node0 (age 20m)
    mgr: no daemons active
    osd: 0 osds: 0 up, 0 in

  data:
    pools:   0 pools, 0 pgs
    objects: 0 objects, 0 B
    usage:   0 B used, 0 B / 0 B avail
    pgs:
集群不健康问题处理
$ ceph config set mon auth_allow_insecure_global_id_reclaim false

$ ceph -s
  cluster:
    id:     97702c43-6cc2-4ef8-bdb5-855cfa90a260
    health: HEALTH_OK

  services:
    mon: 1 daemons, quorum node0 (age 49s)
    mgr: no deameons active
    osd: 0 osds: 0 up, 0 in

  data:
    pools:   0 pools, 0 pgs
    objects: 0 objects, 0 B
    usage:   0.0 B used, 0 B / 0 B avail
pgs: 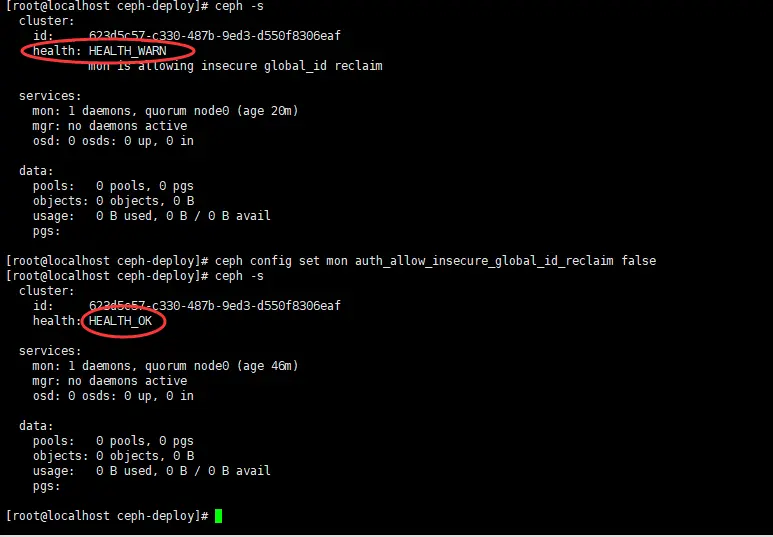
集群监控 mgr 部署
$ ceph-deploy mgr create node0
ceph-deploy mgr create node0

$ ceph -s
  cluster:
    id:     97702c43-6cc2-4ef8-bdb5-855cfa90a260
    health: HEALTH_OK

  services:
    mon: 1 daemons, quorum node0 (age 2m)
    mgr: node0(active, since 5s)
    osd: 0 osds: 0 up, 0 in

  data:
    pools:   0 pools, 0 pgs
    objects: 0 objects, 0 B
    usage:   0.0 B used, 0 B / 0 B avail
    pgs:
Ceph 集群添加 osd
$ ceph-deploy osd create node0 --data /dev/sdb
$ ceph-deploy osd create node1 --data /dev/sdb
$ ceph-deploy osd create node2 --data /dev/sdb
#查看 osd
$ ceph osd tree
ID CLASS WEIGHT TYPE NAME STATUS REWEIGHT PRI-AFF
-1 0.14639 root default
-3 0.04880 host node0
0 hdd 0.04880 osd.0 up 1.00000 1.00000
-5 0.04880 host node1
1 hdd 0.04880 osd.1 up 1.00000 1.00000
-7 0.04880 host node2
2 hdd 0.04880 osd.2 up 1.00000 1.00000 查看 集群状态
$ ceph -s
  cluster:
    id:     97702c43-6cc2-4ef8-bdb5-855cfa90a260
    health: HEALTH_OK

  services:
    mon: 1 daemons, quorum node0 (age 3h)
    mgr: node0(active, since 3h)
    osd: 3 osds: 3 up (since 3m), 3 in (since 3m)

  data:
    pools:   0 pools, 0 pgs
    objects: 0 objects, 0 B
    usage:   3.0 GiB used, 147 GiB / 150 GiB avail
    pgs:
Ceph 集群扩容 monitor 服务
$ ceph-deploy mon add node1 --address 192.168.66.181
$ ceph-deploy mon add node2 --address 192.168.66.182

$ ceph -s
  cluster:
    id:     97702c43-6cc2-4ef8-bdb5-855cfa90a260
    health: HEALTH_OK

  services:
    mon: 3 daemons, quorum node0,node1,node2 (age 0.187697s)
    mgr: node0(active, since 3h)
    osd: 3 osds: 3 up (since 5m), 3 in (since 5m)

  data:
    pools:   0 pools, 0 pgs
    objects: 0 objects, 0 B
    usage:   3.0 GiB used, 147 GiB / 150 GiB avail
    pgs:
查看仲裁情况
$ ceph quorum_status --format json-pretty
Ceph 集群扩容 mgr 服务
$ ceph-deploy mgr create node1 node2

$ ceph -s
  cluster:
    id:     97702c43-6cc2-4ef8-bdb5-855cfa90a260
    health: HEALTH_OK

  services:
    mon: 3 daemons, quorum node0,node1,node2 (age 5m)
    mgr: node0(active, since 3h), standbys: node1, node2
    osd: 3 osds: 3 up (since 10m), 3 in (since 10m)

  data:
    pools:   0 pools, 0 pgs
    objects: 0 objects, 0 B
    usage:   3.0 GiB used, 147 GiB / 150 GiB avail
pgs: 03.jpg)


0